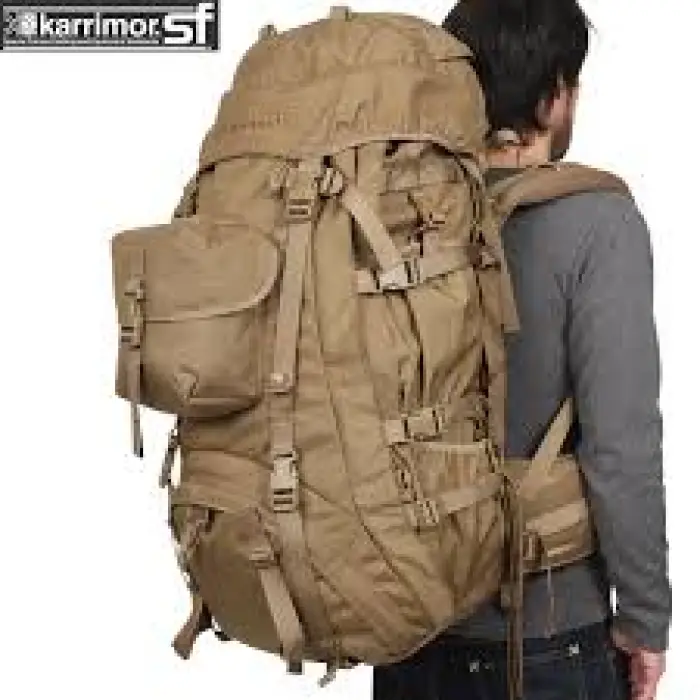
The Science of Pack Fitting
Fitting a backpack can be very hard work and quite frustrating outside of a well-experienced gear shop. However, many of your best deals can be found online and that is why it’s very important to get some basics down before you take that chance and order something from across the country (which you may just end up having to return). It also helps to know what you are looking for before you head into a gear shop so that you can answer the questions that will be thrown at you.
Pack Size
First off, you need to figure out what size pack you want. Essentially this will be determined by what you are going to be doing. If you are looking at a rucksack or small daypack, you might be out of luck for custom fitting. Many come as a one-size-fits-most option - and in many cases that translates to one-size-fits-a-few. However if you want to go with something slightly bigger than a book bag type daypack, there are some moderately-sized rucksacks out there with sizing of XS-XL. They may not be able to be adjusted any further, but some may have a small varying range of adjustment. Essentially this sizing will at least get you a fit within that wider category or torso length.
Are you a long-day hiker? A weekend explorer? Maybe you are a multi-day backpacker? This will raise the size of the pack as well. A long-day hiker may need a slightly bigger pack or a larger rucksack as explained above. A weekender is slightly bigger and has better opportunities for a nice fit and has the options to carry overnight gear. A backpacker or someone who is out for many days may need the largest of packs - and these have lots of bells and whistle for a nice fit, if chosen correctly. With overnight bags it is even more important to get the right fit.
Now winter time is another story, but typically the pack is slightly bigger than one you use in summer - but there is no specific fit for winter. One of the important things to keep in mind when buying a pack for all seasons is the way it will fit with many layers on under it.
Brand
Don’t get hung up on brand, most companies have a wide variety of options and price ranges. Find one that fits correctly and is anatomically correct for your body. With that being said, different brands have different fits, so shop around if you can. Don’t be too narrow-sighted, the latest and greatest by company X just might not be best for you (no matter how awesome it looks in a picture of the perfectly fit outdoor hiker). One model of Northface for instance might not fit the same as another model. Even models of a different year fit differently. Maybe you had a 2009 model rucksack you loved, chances are the 2013 model may have been totally redesigned and fit better, or worse.
Comfort Rating
Not all companies have a comfort rating for their packs. Gregory is one that does, and it can be quite helpful in finding a place to start. A comfort rating is the number of pounds that the pack will handle and still be considered comfortable for the wearer. This rating is of course not a scientifically-proven system, but it's a good guideline to start with, and quite honestly, I feel pretty accurate. If you are going to carry 50-pounds on a long weekend, don’t get a pack with a comfort rating for only 30-pounds; the best fit in the world won’t alleviate 20-pounds of dead weight. You may have a 5 pound variance in the rating, which is quite significant.
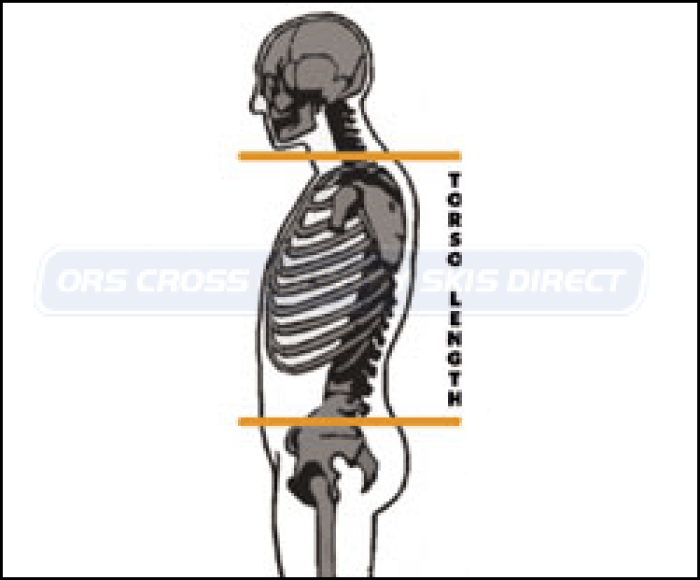
Measurements
You have to know your torso length before you can go any further. “How do I figure that out,” you may ask? Measure from your C7 vertebra in your neck (it’s the one that sticks way out when you bend your chin to your chest), down to your iliac crest or the top of your hip bone (same thing). This measurement will put you in a range from XS-XL. While each company has their own range for pack size, they usually won't vary by all that much. Now you know where to start looking. If you find yourself right on the edge of one size or another, this can be a bit more time consuming because you are going to want to try both on. Typically I find that it’s better to size down and be at the max end of the smaller size.
Sex
Now that I have your attention, are you a man or a woman? This is very important, as you might have guessed, but I am still talking about pack fitting here. In most cases, a woman’s shoulders are much narrower than a man’s. Because of this, a woman’s specific pack has narrower shoulder straps and in many cases they're placed a bit closer together. Sizing is also different than a man’s as far as the XS-XL range is concerned. Straps are shorter and the pack width is a bit narrower. You should shop within your gender specific pack, if you can, and if they are available, before you venture outside of it. Women’s specific packs are much easier to come by online than in retail shops. A woman may need to size-down in a man’s pack, and a man may need to size up in a woman’s pack, but it’s not all that out of the ordinary — essentially they look very similar, in many design and color cases.
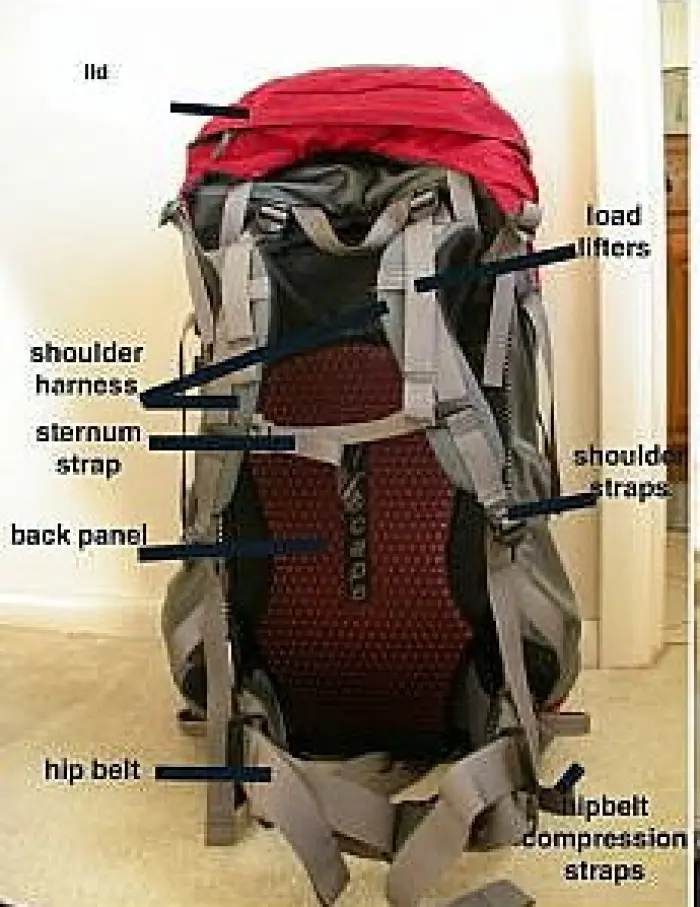
So many straps!!!
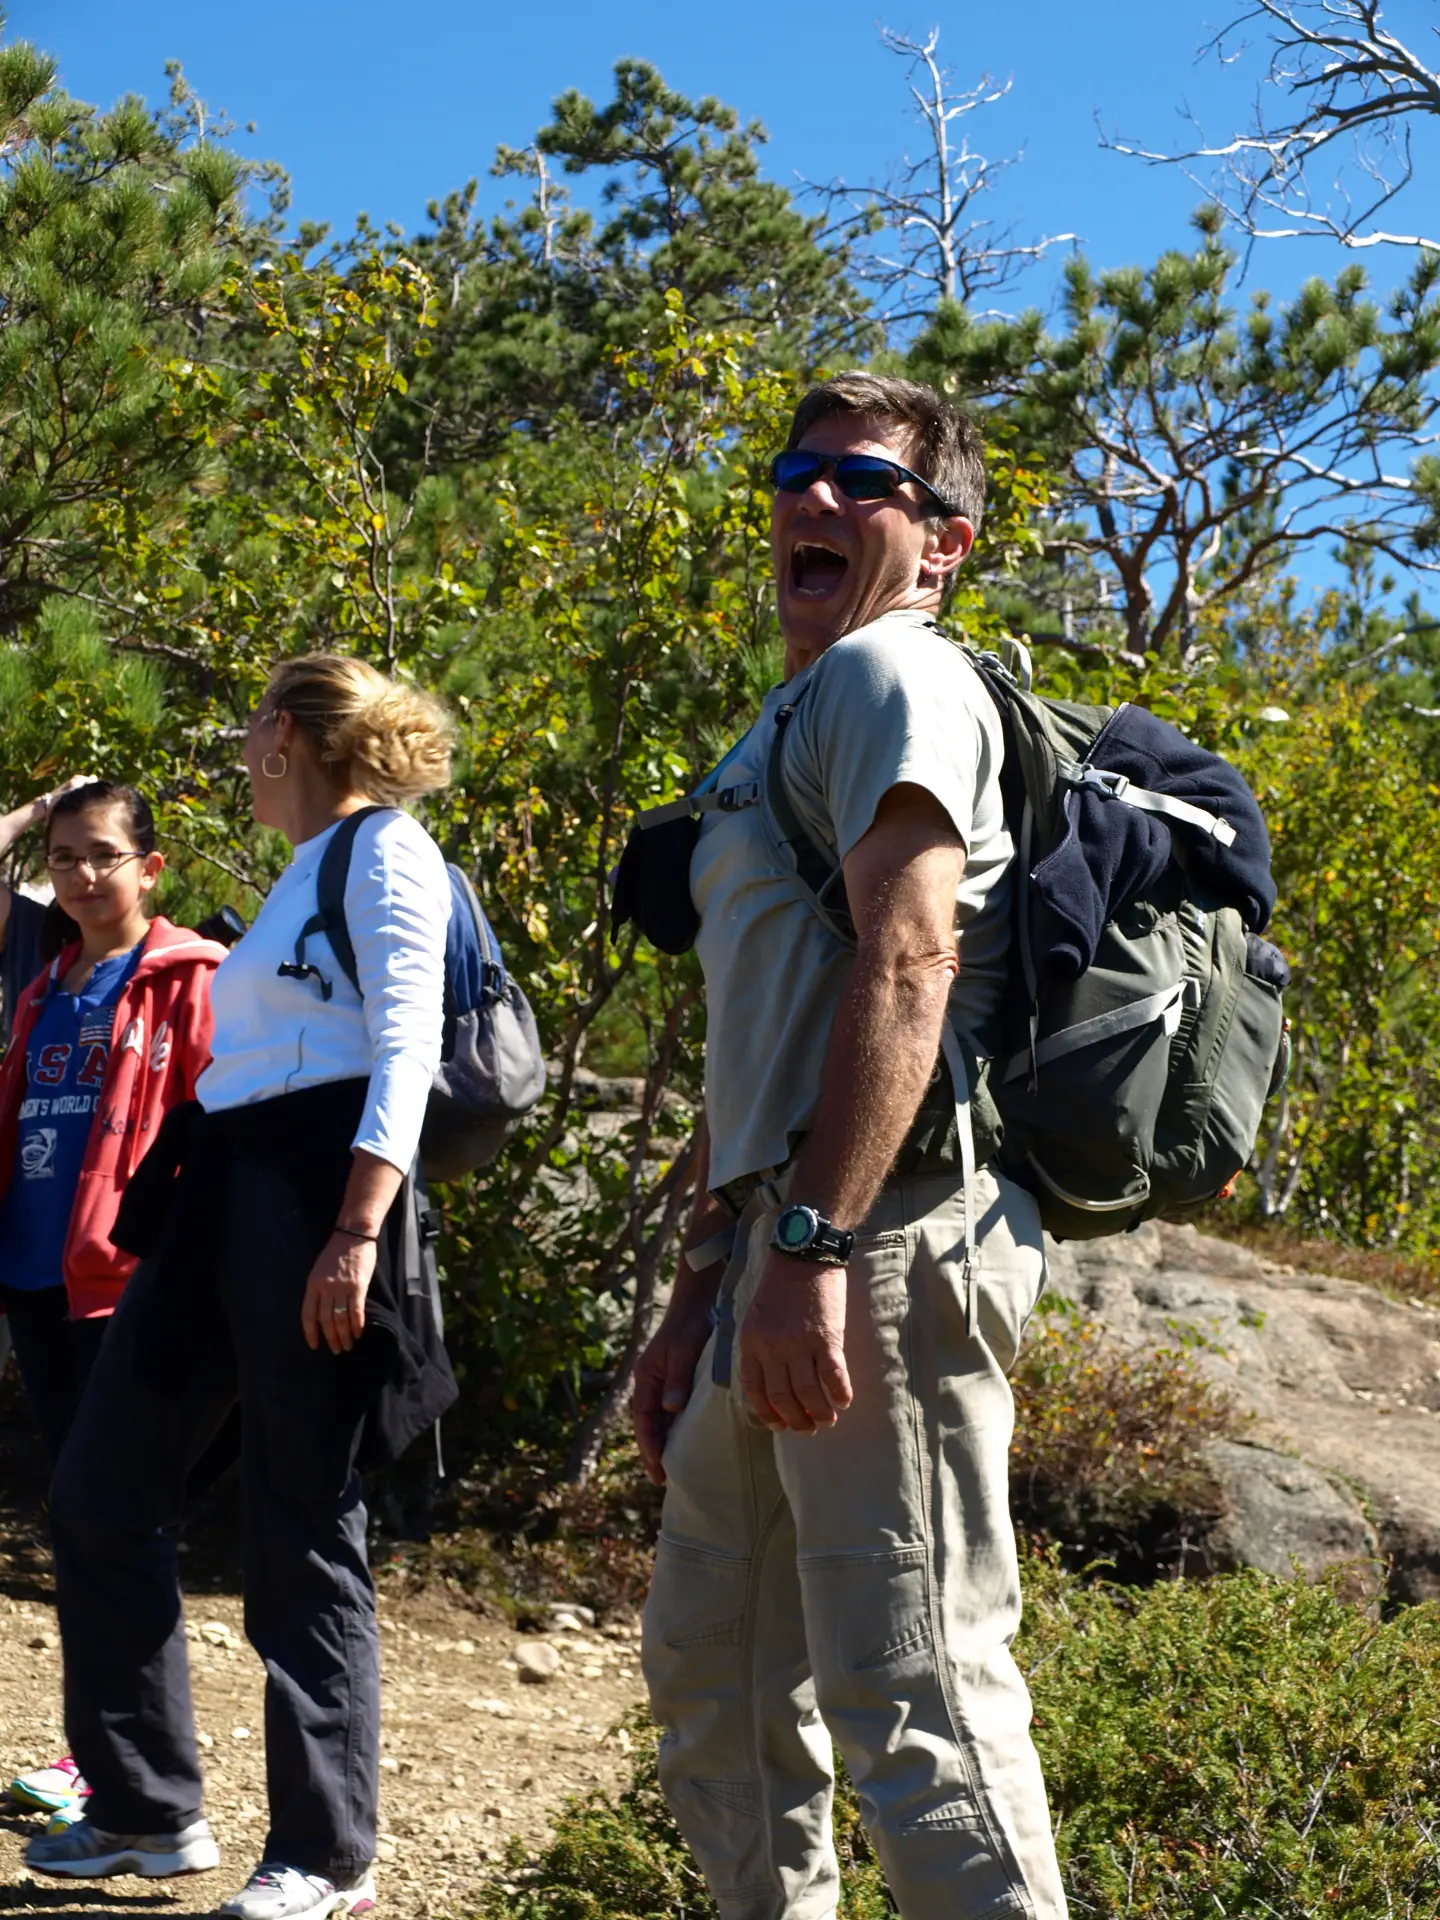
Once you get your pack size figured out, and it’s adjusted to your torso length, you will need to put it on for a final fit. You need to put on a pack that is filled with the approximate weight that you will be hauling - otherwise the straps will sit funny and you won’t get an accurate fit. Load up that pack even with a bit more, just to test it out. There is an order for strap closure and adjustment. Start with all the straps loose and open. Then go in this order:
1.Waist strap – hike it up onto your iliac crest and tighten it down to a comfortable level. You should have about 3-5 inches of strap left on each side of the buckle, it should not be all used. If it is all used that means you have too large of a waist strap and many companies will swap them out free of charge. It could also mean that your pack is too big. Some companies like Osprey offer heat-molded options, but many retailers don’t.
2.Shoulder straps – Pull these down equally on both sides. The buckle should end somewhere under your armpit. If you max them out with no extra strap then the shoulder straps are too big. Some companies will swap these out free of charge, or the pack is just too big. If the buckle is out in front and near your chest, the strap could be too small, again maybe they can be swapped out or you need a bigger pack. There should be no gap between your shoulders and the shoulder strap; they should wrap your shoulders perfectly.
3.Sternum strap – get this buckled and comfortable, this one is very simple, you just need to be able to snap it.
4.Load lifter straps (shoulder) – these straps connect your shoulder straps to the top of your pack. Pull these in to pull the load in closer to you and off your shoulders. This will put more of the weight on your hips and off your shoulders. You should notice a huge difference in how the pack sits and you should rightfully say “ahhhh.” The angle of the strap should be around 45-60 degrees.
5.Load adjustment straps – these are located on the waist strap and bring the bottom of the load closer to your waist. These are good for small adjustments, and over long distances they are very handy. Some pack do not have these, but most overnight packs will.
Packing your pack
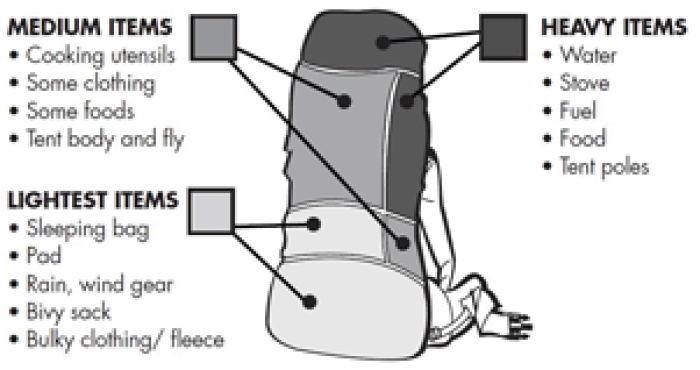
A science in itself, follow this packing order rather than just throwing your stuff in:
- 1. Light and bulky on the bottom (sleeping bag, down jacket).
- 2. Then place medium-weight stuff on top of this area if needed.
- 3. Heavy stuff should be in the middle closer to your back (bear canister, stove, and food).
- 4. Outside-middle should be lighter items - you don’t want the weight pulling you back. Use clothing pieces to fill any gaps.
- 5. Top can be lighter stuff and things you want to be able to get to quicker.
- 6. The brain of the pack is the top lid and should be the essentials, but not too heavy and over loaded (headlamp, snacks, knife, gloves, hat, etc...).
- 7. Lastly, don’t strap too much stuff to the outside even though you may have ample straps to attach the kitchen sink, a full-sized chainsaw, a small child, goodies from your favorite local eatery, and who knows what else. The more you strap to the outside the more awkward the pack will feel and the more out of balance it will become. Leave the outside straps for your bed roll, a jacket and maybe a tent.
As you can see backpack fitting can be very time consuming and kind of like a jigsaw puzzle. There are many different factors so please feel free to get in touch with me if you need help or need some questions answered. I don’t claim to know it all, but time has been a good teacher of mine and the best lessons learned are through experience and trying. You can also stop into a local gear shop and get fitted as well. Good luck and have fun with it!